Pages

Monday, October 31, 2011

Happy Halloween!

Our Halloween fun began last weekend at our church's Trunk or Treat!  This was our "trunk". We needed the firepit, firewood, smore making and chairs for the Sing-a-long Fire later that same night for some youth group fun.  So we set up a camping scene in our "trunk".  I had the kids sing a campfire song with me before getting their treat. It was "baby shark doo do doo". 

Here are us Schusters in sitting at our campfire.
And here is our youth group that night at the Corn Maze and later at the campfire. It was a really fun day!
I am hoping to make some MDS Halloween pages with these pictures soon. Maybe after I get over the MDS blues.  Not feeling it.
Have a great Halloween night everyone!
Cindy

Friday, October 28, 2011

Christmas Photocard-MDS Blog Hop Week 13

This week challenge was my selection and what to do what to do? I wanted to get a start on Christmas cards this year and actually HAVE them printed and ON TIME. Last year I waited til December and printing them thru SU was too late. So I vowed to get them done and early!
Also an incentive was Stampin Up MDS bulk printing prices! See here: Bulk_Pricing_US.pdf
But when I counted the special people in our lives like family and friends and reminding myself that I miss last year, I had like 60 cards that I would need to buy! OY! So then I started looking at the bulk pricing AND trying to watch my budget as well, I decided that I needed to look at an inexpensive option for us.
I came up with the idea to create a Christmas photo tag that my family and friends could use as an ornament on their tree. (I added the shaded parts so that you could see how the tag would be created in MDS)  I knew I wanted to use this family picture from our recent vacation at the beach.  I used the 2 1/2" x 4 1/4" basic tag. I used the Merry and Bright Stamp Brush image #123139 in Lucky Limeade (I love my green!).  The blue in the punch circles and line were matched to my husband's shirt in the picture. Such a great option to have! The red is Cherry Cobbler.  Added the other title and year in Whisper White to play off what us girls were wearing in the picture. I love the confetti look and it just looks cheerful.
Before I sent them to print thru SU, I made a version on my printer at home just to be sure I liked them and how play with how I would finish them off.  I added the Cherry Cobbler Seam Binding Ribbon and Cherry Cobbler Baker' Twine so that it could hang on a tree branch.  This was printed on matte photo paper as the test. I just cut and glued them together. SU printed tags will be on heavy weight cardstock and top rate quality! I can not wait to get them! I JUST ordered them! 
With the bulk pricing on 60 tags, they would be just 60 cents each! DEAL!  That is half the price of smaller printed MDS card in bulk! Then I can buy the Small Open-End Envelopes # 107286 to mail them in since the tags do not come with envelopes.  I am hoping that I can run them thru my printer to add the addresses and maybe a stamped image too. With the cost of the envelopes added, each tag cost 98 cents!
Still the lesser price option! DOUBLE DEAL!
But the most exciting part is that my family and friends will get something unusual in the mail and be able to use it for this year's holiday and for years to come!
Cindy
I also wanted to show you all a picture from the Halloween Birthday party yesterday!
She was totally surprised and loved it all!
Wait til you see all the other designer's Christmas photocards today!  It will get you thinking....I NEED My Digital Studio NOW so I can too get my Christmas cards done FAST!
ME - YOU ARE HERE! : )

Wednesday, October 26, 2011

Teacher's Gift

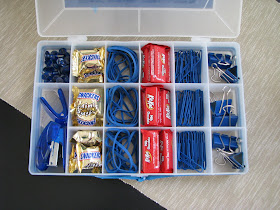
I wanted to show you all the small gift that Allison and I made for her teacher's return to school after materity leave.  I found some clips, stapler, thumb tacks, binders and more in our school color of blue at a local office supply store. We live in Woodstock so Woodstock from Charlie Brown is a theme of ours. I selected this DSP because one..it was blue and two..it has birds on it. 
The colors are Pacific Point and Night of Navy. I printed the letters on whisper white thru MDS program. I punched them out with the pennant punch. The ribbon is retired which I love using up what I have and that it matches perfectly! Love that about Stampin Up products!
Allison found out that her favorite candy is Snickers and Kit Kats. So we put a few in there for a quick boost of sugar for her teacher.  Mrs. Cloud loved it!
Have a great day!
Cindy

Monday, October 24, 2011

Remember When - 25 years ago BFF's

Remember Friday's Blog Hop Challenge? Use DSP out of the box. Well, inspiration took over!

Megan and her girlfriends had just gone to the Homecoming Dance and I was able to take this amazing photo of them! I had to do a page and reminisce a bit too. They remind me so much of my two BFFs from back in the day, Marisa and Lisa.  We still keep up with each other. Lisa is in Cali and having her second baby. Marisa is in Ohio and we try to see each other once a year at least! (yes that is me, a fake blonde)  I even got the girls calling each other Larry, Curly and Moe just like we did.  25 years later, now Candace is Larry, Megan is Moe and Eryn is Curly.
I really love this layout. Simple and clean. The DSP is from Frightful Sight, a Halloween Designer Series Paper.  I love the dotted paper in this pack.  It looks graphic and I pulled the colors from it for the rest of the page. The sentiment is from Wordplay download # 124432. Good Friend "burst" is to the right.

I was going for the 80's graphic look which everything 80's seems to be coming back these days.  I just saw a pair of duck shoes at Kohl's and fell to the floor laughing! Remember those? Did you just HAVE to HAVE them? I so wanted the green ones like below!
Have a magical day and go create something today!
Cindy

Friday, October 21, 2011

DSP Versatility - MDS Blog Hop Week 12

This week's Blog Hop Challenge by the totally wonderful Aly was to show how versatile our MDS Designer Series Paper can be! In other words, use DSP for something other than what it was intended for.  Examples: Halloween for a Birthday party, Christmas for Valentine's, etc.
 I wanted to show first how I started this page.  I had a layout in mind. Filled in the square punch with the DSP from Jolly Holiday. Added some photo boxes. Then waited for the inspiration to hit me....and waited and waited.
I started playing with adding another color Pacific Point to the already Cherry Cobbler, Old Olive and Very Vanilla.  I added punch line with the square punch and added them to the striped paper to change the look of the DSP.  I added the punch stars and flag filling them with colors.  Added the pennant punch with a colored mats for the banner. Wanted that big "&" in there somehow. That owl was a flower at first but once I found some pictures to add, it got changed. By the way, the owl was totally inspired by Heather Summers. He is so cute just like my nephews!
So I took this Christmas DSP and made a Birthday themed page with it! 
DSP Versatility - Mission Accomplished.
Hope this inspires you to think out of the box with your DSP!
Cindy
Want to see more challenges with DSP!
Start hopping below.
ME - YOU ARE HERE!

Wednesday, October 19, 2011

My Digital Studio Retreat

All that planning and planning and in a flash it was over! The day went SO fast! But it was SO much FUN!
It all started on a plane ride to SU Convention this past July.  Monika, my sideline demo and I were talking about would it not be great to share all about My Digital Studio program to fellow demonstrators and have them boost their MDS knowledge of this incredible program!  Then after attending the MDS Intermediate classes and the +Fun MDS class at Convention, we knew we HAD to do it! 
So we planned a full day from 10am - 10pm to do three hybrid projects (above), some class time, some review over printing from home and from SU printing services and then some free time to ask questions and work on projects. We opened it up to our downline and local demos from around the area.  We had a total of 10 demos join us and we divided them into Beginner and Intermediate groups. Monika did the Beginners group and I did the Intermediate group. We both had several oohs and ahhs during the day from all the tips and tricks we were teaching them.  We had a few bumps with PC versus Mac users so it was a learning experience for us too.
Here is my room for the Intermediate Class.
Here is Monika's room for the Beginners Class.
Plenty of My Digital Studio samples to view.
Of course, we had yummy food for lunch (chicken salad on croissants) and dinner (chili and twice baked potatoes) to get all of us thru the long day.
Here we are eating together in Monika's sun room. It was a beautiful day! It really was a fun time together, learning together and sharing all about My Digital Studio!
After it was all over and we had cleaned up, Monika and I could not help but start planning the next one!  Already came up with some different over-the-top hybrid projects that I am excited to get working on!
 January 2012 could not come sooner!
Would you be interested in coming?
Cindy

Friday, October 14, 2011

MDS Blog Hop Week 11

I saw this card on the Stampin Connection in real Stampin Up materials and just loved the layout and the warm fall colors. So for this week's challenge of Gratitude/Thanksgiving (for our Canadian friends), I wanted to reproduce it into a scrapbook page.  My girls and I took our picture together on the same big comfy chair at Disney's Beach Club during our recent family vacation.We did the same picture on the same chair in December last year for our Disney Christmas trip. Starting a tradition here...wish I had started it years ago when they were little.
I used the Day of Gratitude brush stamp set, the Lace Ribbon Border punch, Top Note punch, Baker's Twine and one little Pumpkin Pie button. The short video shows you how I made the stamped center.  I think I sound so weird on videos. But they are fun to do and I am a visual learner like so many and so I hope others can learn from them.

I am SUPER-OVER THE TOP-EXCITED about tomorrow's My Digital Studio Day Retreat hosted by my friend Monika and ME! I will fill you in on the details on Monday!
Thanks for stopping by!
Cindy

Now move on to see some fabulous projects from our MDS designers.
ME - HERE!

Tuesday, October 11, 2011

2012 Calendar Postcard

 Thank you ALL always for leaving kind and encouraging words in your comments on anything I do!
I am really happy to show you another Calendar option in that Design Center section today!  I think this might be my favorite! I am just giddy about it!  This is a 5x7 postcard.  The video below shows you how to use the Add a Year Calendar.  
I am going to have them printed thru Stampin Up Printing Services for some special demo friends.
Then they could use them for display of MDS projects at their workshops!
Thanks for stopping by!
Cindy

Friday, October 7, 2011

MDS Blog Hop Week 10

     This week's challenge was select by Amber. She picked "Halloween Party such as decorations, favors, treat bags, etc" and I KNEW right away what I was doing! I was inspired by two things.  #1 - Sara Douglas on MDS had posted an inspiring blog post HERE on birthday supplies using a new Party Animal kit and adapting it from the "Hello Baby" baby shower templates.  #2 - My co-worker and friend Nicole has a Halloween Birthday but really she likes to celebrate it all month long!  So I wanted to do something special for her birthday in the office this year.


I purchased the Wicked Fun kit #127609 with dsp and stamp brush images because it had Nicole's favorite color in it - Purple and it was Halloween themed!  Then I took the Hello Baby templates and altered them to fit my Halloween theme. I wanted my banner to say Happy Birthday so I had to add some pages which you just add a duplicate page.  I made more scallop letters to punch out with my 2 3/8" scallop punch.

Then I plan to have cupcakes (not the cookies here) from our fav local cupcake bakery so I made some themed toppers. I used a large glue dot with two of these together with a toothpick in between.


You have to have something to drink with those cupcakes, so I made some water bottle covers from the templates.  I have her fav Black Cherry Soda bottles and they become "Nicole's SPOOKY Brew"! I also took one of these, changed it to make the tag on the jar below. 
Then I made some of the pinwheels to place in the jar. The tip is that you print these on one side of paper and then print on the other side. Then you get the colors to show.  Or you can print twice and cut and glue together. I sponged the edges with black ink. I added glitter brads in Old Olive, Rich Razzleberry and Tangerine Tango in the middle of them. I glued matching plastic straws on the back of them.


All ready for a Wicked Fun Halloween Birthday Party!
I know, I know SUPER LONG post with a SUPER BIG project!
 I will be back with the results from the party in 3 weeks.  Check back then!  : )
Cindy

Ok, so moving on to more blog hops with more Halloween tricks and treats!
ME - HERE!
Holly - our newest blog hopper!

Wednesday, October 5, 2011

Go Digital 2012 Calendar Card

My Digital Studio received a new update on this Monday and the first thing I wanted to share with you was the new CALENDARS option in the design center to the right in the program. I use to make these cute desktop calendar cards in real material and a calendar program which I would have to print separately. But now, digital designing on MDS allows that paper image and calendar to be done all at once! WOOHOO! 
I love the Berry Blossums DSP for this! The papers selected fit the seasonal months on each side.
The dotted scallop bow and ribbon just finish it off nicely. 

But wait! I have a VIDEO too? YES I DO!
It will show you how to use the CALENDAR option and how to have it printed thru Stampin Up.
Thanks for stopping by!
Cindy