Saturday, October 30, 2010

Halloween on Target!

I can never go to Target and NOT look at the dollar section!  I was there the other day and found these cute Halloween frames for only $1.25 each!  They were 50% off!!!!!  Then I saw these Halloween rub-ons for $1.00 also in the bin and it hit me....make my own designed frames!  Now these rub-ons are not high quality but they got the job done.  I had just enough words in one package to cover all three frames. 


They look very "Target Style" huh?  But cheap cheap cheap!
 We are going to go enjoy this beautiful fall weather, get a pumpkin and have some of Howard's chili tonight. 
Have a magical spooky day!
Cindy

Friday, October 29, 2010

Happy Halloween Weekend has begun!


This week has been VERY busy!  But it has been productive! So I am going to post over the holiday weekend to make up for it and show all the things that I have been making for Halloween.
I made these mini luminaries for my co-workers.  I followed the tutorial over at Splitcoaststampers here:  luminary TUTORIAL  It was easy to follow and after the first trial luminary, it was smooth sailing to make 6 more.  I did some with the stamped Staz On in Black of the tree all all four sides.  Others were done with the owl punch and bird punch.  I got the fake t-lites to put in them.  The ladies really liked them! 
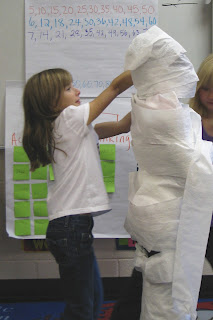
Today, I went to Allison's Halloween Party at school.  They made a spider with snacks and candy.  Ate popcorn and chips and then they played a fun "wrap the mummy" game.  Allison and her 2 classmates did a great job!  It was so fun to watch them.
Have a magical spooky day!
Cindy

Friday, October 22, 2010

MDS vs. Real Stamping

 
This is the MDS version of the last page in the wedding album that I created for a customer.  I used My Digital Studio program to make each page and layout of the book.  Using MDS to do this made it easier for my customer to view and me to edit with her and then finally for me to create using real products.  I can not believe how easy it was to use the MDS program for this.
Here is the REAL stamped page of the wedding album.  We did change a few things like the border on the picture from eyelet border to scalloped border and added the silver border around the title.  I had to use guidelines to get those stamped images in a straight row.   I am planning on using this finish complete layout of the MDS wedding memory book to create my wedding album 17 years later.  Better late than never. I will show here when I get it all done.
Have a magical day!
Cindy

Wednesday, October 20, 2010

Another MDS Birthday but in a page!

I made this page for my BFF Marisa.  We recently went to Disney together and had such a great time!  We have been friends since freshman year of High School. 
Today is her birthday!
HAPPY BIRTHDAY MOE!  LOVE YA!
I can not wait to get this page printed up with the other Disney pages that I have been doing on MDS.  You have seen some so far in earlier posts.  I can not tell you how easy it is to use the MDS program!  I might never go back to regular scrapbooking...maybe a little.  I will get individual pages printed for the Disney album that I bought on our trip.  The cost is $2.50 each for the 12 x 12 size.  I am finishing up the book and layout.  I do save tickets and other momentos so I will have to regular scrapbook those in this album.
Have a magical day!
Cindy

Tuesday, October 19, 2010

Hold on to your hat! A MDS birthday!

Stampin Up just announced an FREE upgrade to their My Digital Studio program today!  It includes all kinds of seven new professional print output products including a trifold card, a journal, a 5.5" x 6.5" calendar with easel, and four postcards!  Lately I have been MDS addicted so I am totally excited about new upgrades! Also they just added a MDS website for demos and customers to get ideas and learn about MDS.  You can find it here: http://mydigitalstudio.net/  If you do not have MDS, I HIGHLY RECOMMEND IT!  Scrapbooking is soooo easy and now with reduced printing prices, even more reason to get the program! The quality is far better then Shutterfly too!

So after I downloaded the update, I went playing!  I made this super easy card using a trifold card template offered in the program.  Today is also one of my dear friend's birthday!  I made this card especially for Maureen (also a SU/stamped pal). 
HAPPY BIRTHDAY MAUREEN!
I sent her a pdf of it in an email but I will try to print and send to her asap!  I asked her to try and save and print herself and see how it comes out.  Curious to see if it works.
Back to playing and see what else is new!
Have a magical day!
Cindy

Monday, October 18, 2010

Halloween Invite x 2

I helped my co-worker Nicole make these Halloween invitations. Her birthday is on Halloween and she throws a party with her family to celebrate. I got the idea from my friend Christine who did a similar invitation layout. This is a card front invitation. I did the text and black stamp inages on the My Digital Studio on White cardstock. To print, I did 4 of them together on a piece of 8.5x11 cardstock. Then we put them on a piece of 4.25x5.5 black cardstock. Next we stamped the spooky house image in Elegant Eggplant (purple is her fav color) but we stamped off the first inking on stratch paper and then on the cardstock so that the image is a lighter version. We punched the holes with the Crop-a-dile at the 1" and 3". Add the ribbon thru them and knotted a dotted piece in the middle. She found some black envelopes and lite purple gel pen to writing the addresses. (the background is a folder in my office)
Then I took the layout and made it a invitation in My Digital Studio form.  I added the baroque swirls and the purple pumpkin face and ribbon in Rich Razzleberry. 
Have a magical day!
Cindy

Thursday, October 14, 2010

MDS Disney Trip page 2

As soon as I saw Heather's day 8 post on her class, I knew what group of pictures to use for it!  The last night of our trip at Vero Beach, Marisa my BFF and I wanted some nice family beach photos.  Some memories:  Very windy, Jory was everywhere, I stepped on a snake, silliness to the extreme, and then pouring rain!  But we got some great pictures!
Colors are Baha Breeze, Soft Suede, and Kraft.  Punches are circle and scallop border. Buttons for embellishment.  Stamp image is from Enjoy the Moment.  Fonts are CK Ali and Serif.  All pictures are 2" x 2".  Another great page to do in real but MDS makes it so easy to fill those little 2" squares with photos and center and zoom what you want of the photo. 
Have a magical day!
Cindy

Wednesday, October 13, 2010

MDS Disney Trip page 1

I have been working on My Digital Studio lately and getting our latest Disney trip scrapped.  Stampin Up is offering discounts on their printing individual pages starting Oct 19th, so I want to get these pages done to get them printed asap!
The layout is courteous of Heather's last MDS online class.  Great for a real scrapbook page as well! The rectangles measure 2 3/4" x 3 1/2".  Colors are Daffodil Delight, Real Red, Pacific Point and Wild Wasibi with Basic Black. Fonts are CK Ali and A Red Bucket. Punches used are Star, Scallop border and corners.  I was so excited to find a fireworks stamp on the program!  This page was done in 20 minutes and is why I love MDS so much!
Jory's faces just make me giggle with delight!  He will be two years old soon and he is such a ham!  His mama is my best friend.  (miss you all)
Have a magical day!
Cindy

Tuesday, October 12, 2010

Gift Bag Tag

I was getting some gifts pre-done and came across Jill Hillard's post here: http://jill031070.blogspot.com/  I love how she used the Tags Die Cut for the Big Shot and for a gift bag rather than a card. That "flag" part was created by stamping the Mediallion stamp set in Basic Black and then cut out of it.  Looks like designer series paper huh?  The flower is one that I had in felt hanging around.  Punches used are Scallop Oval and Large Oval for the sentiment.
I put a white poodle Webkin in the bag with some pink lip gloss and poodle stickers.  So now we have a gift ready for the next girl birthday party!
Have a magical day!
Cindy

Friday, October 8, 2010

Happy Anniversary Pair of Owls


My friend Christine "babysat" some of my new SU items while I was on my Disney vacation recently.  She had lots of fun and showed me a card that she cased from the SU catalog.  I just loved it!  My parents' 43rd anniversary was coming up so I also had to case the card for these two important people in my life in honor of their love for each other.  The card just suits them too. 
Colors are Old Olive, Cajun Craze, Chocolate Chip, Soft Suede and Very Vanilla.  I used the border punch, the owl punch, trio flower punch and the bird punch.  I used a retired stamp set for the sentiment and another floral stamp on the lady owl.  The Very Vanilla measures 3 1/4"x 3 1/4" and popped up on dimensionals.  I do miss the chocolate chip striped ribbon and I am so glad I have a roll of it left.
Have a magical day!
Cindy

Thursday, October 7, 2010

Friend to Friend Birthday

When I saw that you could make penguins out of the new Owl Punch, I knew I had found that right card for my friend Kim's birthday. She LOVES penguins! I also remembered that her kitchen was red and she was loving the new color in her new kitchen.  Kim was turning that magical number like I did earlier this year and she so deserved something extra special.
I started this card by cutting the Top note die cut with Real Red cardstock. Then I ran it again in the Big Shot with the swirl embossing folder. The only thing you have to do to make the owl body a penguin is cut off his ears (ouch!), add a Pumpkin Pie small triangle and punch the body the colors of the penguin. I added the heart in Real Red from the owl punch to the word window punched sentiment from Teeny Tiny Words stamp set.
I know that Kim had a great birthday and she really loved her card!
(love ya girlfriend)
Have a magical day!
Cindy

Wednesday, October 6, 2010

Halloween 6x6 page

As a Stampin Up demonstrator, we get a monthly magazine full of business articles, news, and LOTS OF IDEAS!  I cased this 6" x 6" scrapbook page from the August issue.  I just love how it turned out!
The colors are Cajun Craze, Old Olive, Very Vanilla, Rich Razzleberry and Basic Black.  I did change it a bit and used a different Halloween stamp set.  I also ran the Baroque Wheel in Black on the background.
Then I decided to try and make the scrapbook into a card.  I added the vintage embossing folder to the base cardstock in Basic Black.  Then I took it a step further and added a 3 x 3 picture of my daughter Allison to the card front and put magnets on the back of the card.  It is on my frig for Halloween. 
Have a magical day!
Cindy

Tuesday, October 5, 2010

Halloween Treat

Here is my version of the candy wrapper die cut.  Many are making this cute thing in different ways.  Last year, I made this manually with scoring and cutting.  Finally, SU got it together and saw how popular this little treat box was!  This die cut is smaller than the ones hand made but still the ease of it tops it all.

I used Pumpkin Pie, Rich Razzleberry, Old Olive and Basic Black for the colors.  I cut one endof the candy wrapper to close the bottom of it.  Just cut the score line and fold like you would a box. I embossed the Rich Razzleberry with the Vintage folder. Then I sponged the edges with the same color.  The ghost was made from the Owl punch.  I took the main body of the owl and cut off the feet! Clever huh?  I love the google eyes on him!  I used our new 1/8" ribbon in Black.  Last was the little jewelry tag and the Teeny Tiny Words that was markered and huffed on the Old Olive and punched out.

This little treat holds two Nerds boxes or a mini Snicker candy bar!  Halloween is around the corner so I better start making these treats for classmates and co-workers.
Have a magical day!
Cindy

Monday, October 4, 2010

A spoiled Thank you!

This is the Make and Take card that Christine's guests made at the workshop on Sunday.  I used Daffodil Delight cardstock and ran it thru the Vintage Embossing folder in the Big Shot.  Next we added the Poly Stitched Ribbon in Pear Pizzazz with a simple knot.  We stamped in Early Expresso the Thanks sentiment from the Level 1 hostess set on a piece of Very Vanilla and punched out with the new Decorative Label from the Holiday Mini Catalog.  The border was done with the Decorative Label cut into two pieces and glued to the back of the Very Vanilla stamped piece.  We punched out the flower of the Boho Flower Punch in Pear Pizzazz.  We added a new pearl to the center of the flower.  The whole piece is then popped with dimensionals on top of the ribbon.
Simple card but a Wow Card at the same time. Many were first time stampers so it was an easy ice breaker.
Thanks for stopping by!
Have a magical day!
Cindy