Wednesday, November 26, 2014

Gift Box and Ornaments - Stampin' UP Artisan Blog Hop

Welcome back to the Artisan Design Team Blog Hop! We are finishing up our November box from Stampin' UP. This box was full of Christmas kits and stamps from the Stampin' UP Holiday Catalog! I am so excited to share fun and seasonal projects to inspire you! Every Thursday of each week for one full year, all 16 of us from all over the world will post on our blogs an inspiring project for you! Be sure to get Google Translate so that you can read in your language all about how they created their projects too. Now on to my project this week...punch board packaging with handmade ornaments!
We received the Gift Box Punch Board in our box this month and I was so excited to finally get to play with it! Over the weekend, I made several size boxes with Whisper White cardstock to make a boxed snowman (share that later). I especially liked the 4x4x4 size box made from a 12x12 sheet of cardstock so I decided that I wanted to showcase this size as some easy to make gift boxes. Well as you can see it went way beyond that! I HAD to make something to put in them! TA DA....
I have been seeing these ornaments all over the place. Stampin UP even made some like this for the Founder's Circle event! I used Silver Glimmer Paper and the Dazzling Diamonds Glimmer Paper to make my ornaments. They are really easy but they require you to punch HUNDREDS lots of them! One 12x12 sheet makes 2 ornaments if you punch them right. I used my hot glue gun to attach to a clear plastic ornament (local craft store) and you can follow a video HERE by the talented Dawn Griffith (LUV HER) to make them. I added Stampin UP ribbon for the bows and the twine from the kit for the hanger. I need to get some more colors of that 5/8" Satin Ribbon. It looks so pretty in the Gold! I know I am going to give these away but they look so good on my tree! Wahhhhhh!
 I wanted to make cute tags using the Under the Tree Tag a Bag Accessory Kit. I added some more patterned paper using the Trim a Tree Designer Series Paper Stack. I used a simple color combo of Pistachio Pudding, Garden Green, Crumb Cake, and Whisper White. Can you see these also done with the remaining green, red and brown tags from the kit?

Here are the close ups of each tag. Click on the photo to see enlarged. Very simple with stamped images from the Cheerful Tag Stamp Set. That is a MUST HAVE stamp set for this holiday of gift giving!
Thanks for stopping by! I hope this inspire you to create these handmade holiday gifts and packaging for that someone on your Christmas list!
Cindy
You saw my friend, Becky Cowley before me and now move on to my friend, Helene Legrand by clicking on the next button below! Be sure to stop by all 16 of us!

Thursday, November 20, 2014

Fancy Friday Blog Hop - Pretty Packages

Welcome to the FANCY FRIDAY BLOG HOP for a
"Pretty Packages" Challenge!
My fancy friends and I are BACK! We loved working with each other so much that we decided to continue on with an all new blog hop to inspire you in fun new ways! Each month on the last Friday, we will bring to you new challenges of all kinds (color,sketch, stamp focus, etc) that you can even participate in! This month we all wanted to make some pretty holiday packaging to inspire you because you know the holidays are just around the corner! LITERALLY! We hope you will join in on the fun and share with us if you do! Use #fancyfriday if you do share on social media!

For my pretty packages, I used the Stampin UP Festive Designer Kraft Paper Rolls. You get two rolls of printed kraft paper for a bargain price of $9.95! Did you know that you can also stamp on this double sided gift wrap? Gotta try that!
For this first package, I used the Cherry Cobbler 1" Sheer Linen Ribbon and the Cherry Cobbler Chevron Ribbon to make a layered bow. The tag is from the Note Tag punch. I cut an Old Olive Tree Punch shape in half to make it appears longer behind the tag. I used the Cheerful Tags Stamp Set and the Endless Wishes Stamp Set in Cherry Cobbler and Old Olive. I added a little heart punch with Kraft Cardstock but left room to write my name or their name.

 For the second package, I recently saw the Whisper White 1/4" Sweater Trim yarn from last year's Holiday Catalog in the Clearance Section and bought two rolls for just 3.59 each. "Brown paper packages tied up with string...these are a few of my favorite things..."
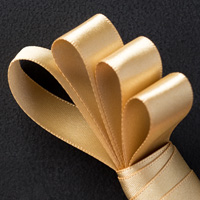
I used some Gold 1/8" ribbon and Gold Sequin Trim to enhance the plain white yarn. I think the tag is my favorite! I used the Note Tag Punch again and the Cheerful Tag Stamp Set with Black Memento Ink. Then I punched just the bottom with the Confetti Star Punch. I punched a piece of the Gold Shimmer Paper with the Note Tag Punch and add it behind. The largest Star Framelits Die with the Gold Foil Sheet adds a perfect background layer.

Thanks for stopping by! I hope this inspire you to get out your Stampin Up supplies and start creating some pretty packages!
Cindy

Now move on to the FABULOUS and FANCY 
Connie Collins by clicking on the next button below! 

Wednesday, November 19, 2014

Sending Simply Gratitude - Stampin' UP Artisan Blog Hop

Welcome back to the Artisan Design Team Blog Hop! We are on our November box from Stampin' UP. This box was full of Christmas kits and stamps from the Stampin' UP Holiday Catalog! I am so excited to share fun and seasonal projects to inspire you! Every Thursday of each week for one full year, all 16 of us from all over the world will post on our blogs an inspiring project for you! Be sure to get Google Translate so that you can read in your language all about how they created their projects too. Now on to my Stampin' UP Facebook project this week...my Simply Created Gratitude cards!
One look at this Gratitude for Days Simply Created Kit and I knew that I want to ACTUALLY send them to people that are such a blessing in my life. To do that, I had to turn this "garland" kit into individual cards. It really was rather simple. I cut 8.5 x11 cardstock of Basic Gray, Hello Honey, Lost Lagoon, Tangerine Tango, Blackberry Bliss and Old Olive into 4.25x5.5 bases with rounded corners at the bottom. Then assemble the pockets, add the numbers, an Autumn Wooden Elements leaf or acorn (I will missed these so much when the Holiday Catalog is over) and tie a bow with the twine from the kit.
Of course, I had to add some stamping along the way! I used the Gratitude for Days Photopolymer Stamp Set for the notecards and the Whisper White envelopes. I made my list of my top 10 blessings of this year and filled out the notecards with thoughts on how each of those people change my last year. With this kit, I could go to 30 blessings but I wanted to use 11-30 for birthday cards like my friend Mercedes did HERE. Love her gift card idea for this kit!

Thanks for stopping by! I hope this inspires you to 
thank the people that mean so much to you! Tis the season to be thankful!
Cindy
You saw my friend, Becky Cowley before me and now move on to my friend, Helene Legrand by clicking on the next button below! Be sure to stop by all 16 of us!

Christmas Card 2014 - MDS Blog Hop

WELCOME TO THE MDS BLOG HOP!
A bunch of us have joined together to share our passion for digital designing with Stampin' UP's My Digital Studio.  These ladies are SERIOUSLY talented in MDS and I am thrilled to be on this Blog Hop with them! You will find us blog hopping on the 2nd and 4th THURSDAYS of each month! We are a little early this month due to the holidays! ALSO we have a guest blogger this month of November! MONIKA DAVIS She is my dear friend and my "partner in crime" with our MDS biz. Believe me, she knows her MDS! So this blog hop is all about WHAT YA DOING in MDS?
Seriously I was wondering what to do for this blog hop when I looked at my calendar and realized that it was NOVEMBER 16th! Thanksgiving is next week! HOLY MOLY! I needed to get my butt in gear and get a holiday card designed asap! I gotta get them into the printer to get back in time to send out BEFORE Christmas!
FRONT OF CARD
BACK OF CARD
I have been seeing alot of black, white, red and gold themed Christmas decorations out there! I find the color theme very elegant. So I was inspired by my visions of that decor for my design. To get the curve of white around the photo, I used the leaf punch blown up to get that perfect curve. You can see how I use it HERE as well on a calendar. I am also loving the long look of a postcard photo card. What is so great is that you get envelopes with these when you print thru Stampin UP! MDS print services! I plan to get this card printed for family, friends and church family this year so watch out some of you are getting a preview! LOL

Thanks for stopping by! I hope this inspires you to get your Christmas photo cards done ASAP
 Cindy 
Click on the button to move on to see what Cori made!