Thursday, October 30, 2014

Fancy Friday Blog Hop - Lullaby Christmas

One of the greatest things EVER is Stampin' UP! Designer Series Paper! Do you not agree? I mean 24 sheets of 12 patterns and chocked full of potential!
Welcome to the FANCY FRIDAY BLOG HOP for a Designer Series Paper Challenge!
My fancy friends and I are BACK! We loved working with each other so much that we decided to continue on with an all new blog hop to inspire you in fun new ways! Each month on the last Friday, we will bring to you new challenges of all kinds (color,sketch, stamp focus, etc) that you can even participate in! But wait....
Some of us are even giving away to one lucky winner the DSP that we worked with!
Yeppers! Be sure to hop to each fancy lady on the Fancy Friday Design Team and follow their instructions to WIN!
I use the Lullaby Designer Series Paper from the Stampin' UP! Annual Catalog. I love this DSP! Such a soft pastel color combo and great designs! I also just got this beautiful stamp set called Ornamental Pine from the Holiday Catalog so I jumped at the chance to play with it. I stamped the pine branch and sentiment with Baked Brown Sugar, the ornament with Crisp Cantaloupe right on top of the Designer Series Paper pattern of Hello Honey and Crisp Cantaloupe "bohek" or "confetti" dots. Have you ever use DSP this way? Actually stamped right on it?

I added some of the Frosted Sequins and In-Color Sequins for even more sparkle. See the Blushing Bride 1/4" Cotton Ribbon? Nice touch of a softer Crisp Cantaloupe. Of course, I had to use more of the DSP to make a matching envelope! I added a Lullaby piece cut with the largest Envelope Liners Framelit and placed into a Whisper White envelope.
Now the deets on how YOU can win this 
WHOLE PACKAGE OF THE LULLABY 
DESIGNER SERIES PAPER!
Just leave a comment to THIS blog post with your first and last name as well as your thoughts on this project or paper. Be sure to include your email address in comment process. Only ONE entry per person! 
You have until midnight November 6th, 2014 to submit your comment entry. 
Winner will be announced on Friday November 7th, 2014 on my blog. 
The winner will have until November 10th, 2014 to contact me via email @ nutmeg1197@aol.com with their address. 
Should I not hear from the winner, I will select another winner. 
US/Canada mailing only.

Thanks for stopping by! I hope this inspire you today!
Wednesday, October 29, 2014

Stampin UP Artisan Blog Hop - Thankful for...

Welcome back to the Artisan Design Team Blog Hop! We are working on our LAST project for the October box from Stampin' UP. This box was full of products from the Stampin' UP Holiday Catalog! I am so excited to share fun and seasonal projects to inspire you! Every Thursday of each week for one full year, all 16 of us from all over the world will post on our blogs an inspiring project for you! Be sure to get Google Translate so that you can read in your language all about how they created their projects too. Now on to my projects this week... 
I was inspired by the utensil muslin bag show in the Holiday catalog on page 40 to create these two items for our extra weekly project this month (we usually do just 4 projects per month). I still need to finish writing what I am thankful for this year! But seriously, I am most thankful to be on this Global Artisan Design Team this year and for all of YOU that follow our blog hop each week! THANK YOU SO MUCH! Your wonderful comments here and pinning my projects on Pinterest make my day! *hugs*
And then from that I was inspired to do this.....I took this crafty technique shown HERE and applied it to make a wreath. Just one change, I made the strips larger to 1" rather then the 1/2". Then I made TONS of those single "leaves" (48 to be exact) and STILL did not have enough so I had to make another 24. They are glued all together and attached to several layers of 1"x12" strips to make the circle "hoop". (I also use 1"x12" strips of the heavy weight DSP packing board in between them for even more support. I colored the edges of it with the Baked Brown Sugar marker to hide it in between the Kraft Cardstock.)
The best part? I made it so that I could take off the Autumn leaves and add other holiday embellishments to it. So watch out for what I add for the winter/Christmas! Coming soon!

Thanks for stopping by! I hope this inspire you!
Cindy
You saw my friend, Becky Cowley before me and now move on to my friend, Helene Legrand by clicking on the next button below! Be sure to stop by all 16 of us!

Monday, October 27, 2014

MDS Monday Sketch Challenge #88

My sweet friend and amazing MDS guru Jeanna created this week's challenge for us over on MDS Monday Blog! I love that she said to go with LOTS of layers and embellishments which is so not me. I also played with the new tip I shared last Thursday HERE. The Days to Remember download is what I use mostly with this page. The leaf punches come from the Wonderfall download. It was lots of fun to make this page and I love the layout for many pages yet to come!

Challenge Guidelines:
  • Please create a new MDS project for the current challenge.
  • Provide a link back to MDS Monday or use the Challenge Graphic above within your post.
  • Link directly to your Post for this challenge, not your entire blog. (So we can find your project)
  • You can create a Card, Scrap Page or 3-D Object with the Sketch.
  • The Challenge will end on Saturday November 1st @ 12pm EST. 
  • Have fun! 

You can give the challenge a try and submit your own page if you click on the MDS Monday button on the right side! MDS Masters and I made it with MDS Monday runner ups are announced every week. 

 Thanks for stopping by! I hope this inspires you today to get into 
MDS Mondays and our challenges!
Cindy 

Thursday, October 23, 2014

Thankful Crop - MDS Blog Hop

WELCOME TO THE MDS BLOG HOP!
A bunch of us have joined together to share our passion for digital designing with Stampin' UP's My Digital Studio.  These ladies are SERIOUSLY talented in MDS and I am thrilled to be on this Blog Hop with them! You will find us blog hopping on the 2nd and 4th THURSDAYS of each month!  
For the MDS Blog Hop this time, we are sharing what we have been doing in MDS!
So once a month, my friend Monika and I hold an online virtual digi crop on our Facebook group page. We had one just this week! If you missed it or not part of our group, you still can join us! Just look for our group: MDS Virtual Digi Crop and ask to join. Once we approve you then you can click on events and see both challenges there. But I wanted to share my challenge with you here and inspire you to go create and join us!

I am going to share the feature where you can crop an embellishment. You can get really creative with this!  Several of the ladies who joined us had some great ideas on this technique.

1. Select an embellishment that has a wide area to crop from. The burlap flag here is perfect for this with the texture. Add to your project. Now click on CROP in the Design Center to the right under Embellishments.
2. In the Crop Embellishment area, select CROP SHAPE. 
3. Now you will want to choose the punch. I used the maple leaf punch from the Wonderful download. Then click on APPLY when done.
4. The Crop Embellishment area will come back up and you can see the maple leaf image coverage is larger than my burlap embellishment. Click on the corner box and size down the image fits. Select OK. 
5. Now your cropped embellishment will appear on your project. You can use the corner boxes to alter the size of it. (you can even re-color the embellishment from here like I did and re-colored to Tangelo Twist)
Here is a link to a video that shows how to Crop Embellishments from Stampin’ UP. http://www.mydigitalstudio.net/video/crop-embellishments


Thanks for stopping by! I hope this inspires you to join our monthly 
online virtual MDS digi crop nights! 
 Cindy 
Click on the button to move on to see what Cori made!

Wednesday, October 22, 2014

Holiday Home - Stampin UP Artisan Blog Hop

Welcome back to the Artisan Design Team Blog Hop! We are working on our October box from Stampin' UP. This box was full of products from the Stampin' UP Holiday Catalog! I am so excited to share fun and seasonal projects to inspire you! Every Thursday of each week for one full year, all 16 of us from all over the world will post on our blogs an inspiring project for you! Be sure to get Google Translate so that you can read in your language all about how they created their projects too. Now on to my projects this week... 
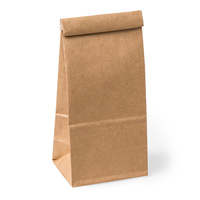
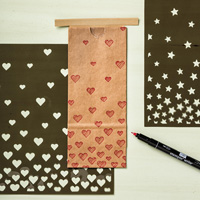
I have to say that this little blockbuster of a stamp set called Holiday Home is so fun to play with! You could really make a complete holiday scene on a card with all the details from each current holiday season upon us. I opted with the first project to take it simple. We recently had some friends move into a new home (across the country sadly) and I needed a card to send to them. I love how simple this card is! I stamped with Baked Brown Sugar since it closely matches the Kraft Cardstock color which by the way is what the house framelit is cut out of. I used Cherry Cobbler ink, Baker's Twine and Cardstock. I punched that little heart out of the house and replaced it with a punched Cherry Cobbler heart from the same punch. The Petite Cafe Gift Bags are stenciled with the Hearts Decorative Masks and Versamark with a sponge dauber. That yummy Cherry Cobbler Sheer Linen ribbon is in the new Holiday Catalog and I love its stiffness for a flag banner on the bag. To add a little whimsy to the bag, I added a worn out dis-colored old house key. 
THEN the fun ideas started in my head....thinking about holiday gift giving, I came up with this "STEP UP" version of the project. I added the strains of lights, the wreaths and Santa with reindeer to the "scene". My heart melted and I was TOTALLY in love with this stamp set even more! For the coordinating gift bag, I ran the bag thru the Big Shot with the Northern Flurry Embossing Folder. I used the Wonderful Wreath stamp set and matching framelits for the Old Olive wreath.

Thanks for stopping by! I hope this inspire you!
Cindy
You saw my friend, Becky Cowley before me and now move on to my friend, Helene Legrand by clicking on the next button below! Be sure to stop by all 16 of us!