Showing posts with label Easter. Show all posts

Wednesday, March 16, 2016

Fancy Friday - Spring Inspiration Bunnies!

Welcome back to the Fancy Friday Blog Hop!
My fancy friends and I are back with some NEW fancy friends too! We loved working with each other so much that we decided to continue on with an all new blog hop to inspire you in fun new ways! Then a few of us had to take a break so we invited some new FANCY friends to join us and make the blog hop a little longer for your enjoyment! These are a group of past and current Artisans that have become fast friends thru the Artisan journey.
 Each month on the last Friday, we will bring to you new challenges of all kinds (color,sketch, stamp focus, etc)! This month will be one week early due to the holidays. This month we have some spring inspiration photos to create something from, thanks to our dear friend Marisa!
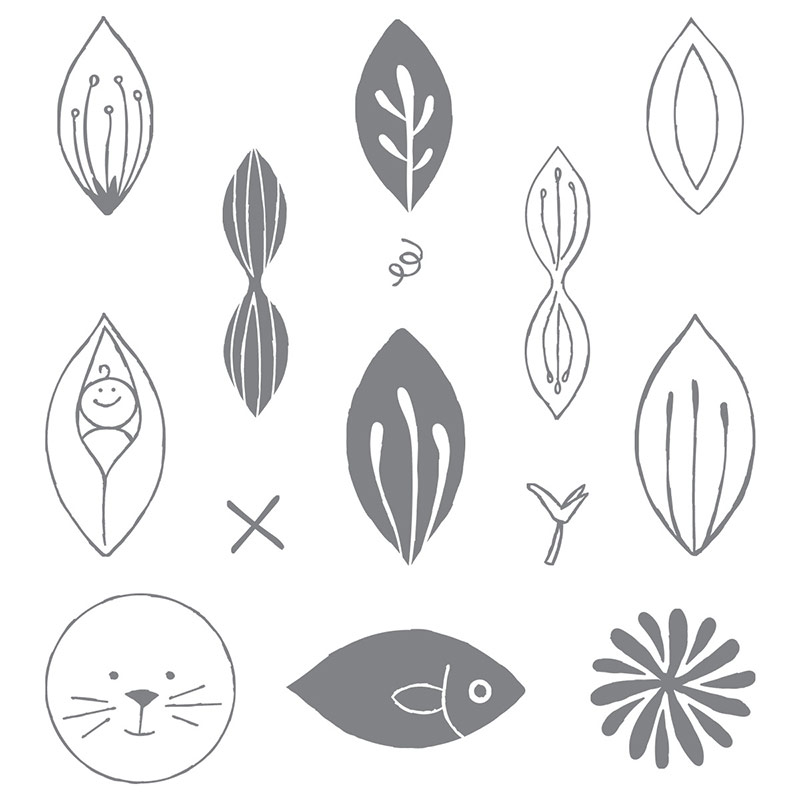
I don't know if you can see them clearly enough on that photo of the HOP HOP HOP table setting but there are bunnies on there! I have been wanting to create with the bunny image from the Friends and Flowers Stamp set shown below. I have a few more fun projects in the near future with this stamp set too!
To create my bunnies, I used the Curvy Keepsake Box Thinlits Dies. I can get two boxes out of a piece of 8 1/2" x 11" cardstock! I used almost every color of the Subtles cardstock! In color order are Calypso Coral, Blushing Bride, Pink Pirouette, So Saffron, Wild Wasabi, Soft Sky, Pool Party and Wisteria Wonder. 
I used the Subtles Stampin' UP Write Markers with Basic Black Write Marker to color the bunny face stamp. I also did this to stamp the ears. You will want to use the Festive Flower Builder Punch (on sale this week til Tuesday!) and the 1 3/8" circle punch to punch them all out! 
I attached the ears to the face with adhesive. Use Tear and Tape Adhesive to attach the face to the box. Be sure to place the bunny face on the side that will come off first. 

For the bows, I used the Bow Builder Punch and the Color Me Irresistible Specialty Designer Series Paper. I went with the dots and stripes on the patterns. Hard to see but I like the white with the embossing pattern on them.
The tag is Basic Black cardstock cut with oval tag from the Curvy Keepsakes Thinlits Dies. I stamped the greeting from the Circle of Spring Stamp Set in StazOn White Ink. Just use a mini glue dot to adhere to box. I finished the bunny with a white pom pom that I had in my craft stashAdd with a mini glue dot. So cute!


Now to fill them with some Easter candy and give them away! 
What candy will I pick? Hmm?

Thanks for stopping by my post for the Fancy Friday blog hop!
Inspire. Create. Share. That's what I love to do.
Cindy
You saw Allison Okamitsu's project before me and now move on to 
Jennifer Timko's project by clicking on the next button below! 

Wednesday, February 17, 2016

Fussy Cutting Blooms - Stampin' UP Artisan Blog Hop

Welcome back to the 2015-2016 Stampin' UP Artisan Design Team Blog Hop! 
I am so blessed that I get to create and inspire with these amazing Stampin' UP products and share with you all here for another wonderful year! Remember that every other Thursday, all 20 of us from all over the world will post on our blogs an inspiring project for you! Be sure to get Google Translate so that you can read in your language all about how they created their projects too. Please keep hoppin' thru them all....you do not want to miss anyone of these amazing ladies!

This week we are showcasing our Artisan projects for the Stampin' UP Facebook Page this month. For this project, the team was to focus on the Easter Lamb Stamp or the Birthday Blooms Stamp set with the Birthday Bouquet Designer Series Paper. Plan to see a lot of different design styles with these selective products as you move thru the blog hop! 

All of these are such great Spring products that I decided to showcase ALL of them and create a group of projects with the same color combo. I also focused on the technique that many stampers really dislike or love....fussy cutting!
For this card, I cut these beautiful flower blooms directly from the Birthday Bouquet Designer Series Paper, used the Birthday Blooms stamp for around the blooms and the greeting. One of the blooms is popped up on Stampin' Dimensionals. I also added mini hearts in Gold Glimmer Paper with the Confetti Heart Border Punch. 
For the gift box, I used the Takeout Boxes with a strip of the Birthday Blooms Designer Series Paper. Don't you love the yummy Watermelon Wonder 1" Stitched Satin Ribbon?Then I cut just a part of a bloom off the same Designer Series Paper and added it to the Note Tag Punch with a Clothespin. Now I have the perfect package and card set for someone's Spring birthday! But wait, there is MORE....
For this card, I fussy cut that adorable image of the Easter Lamb out. I stamped him first in Basic Gray Archival Classic Ink and added Blushing Bride color with a Blender Pen. Some more fussy cutting happened with the Fringe Scissors to make cut grass of Mossy Meadow and Old Olive. The 2015-2017 In Color Blossom Accents in Watermelon Wonder make the flowers. Perfect to send next month!

Thanks for stopping by here and if you leave a comment then thanks for truly making my day!
Inspire. Create. Share. That's what I love to do.
Cindy

Now on to one of my dearest friends and Artisan Design Team sister for life.....Connie Collins! She will blow your mind!

Follow our brand new Pinterest board *here*. 

Wednesday, February 25, 2015

Easter for Peeps' Sake - Stampin' UP Artisan Blog Hop


Welcome back to the Artisan Design Team Blog Hop! We are finishing up our February 2015 box from Stampin' UP. This box was full of brand NEW products from the Stampin' UP Occasions Catalog! Every Thursday of each week, all 16 of us from all over the world will post on our blogs an inspiring project for you! Be sure to get Google Translate so that you can read in your language all about how they created their projects too. Now on to my project this 4th week...I am getting a head start on some more Easter cards!
For my card, I used the Soft Sky Blendabilities Light for the brush-like-stroke lines across the Whisper White cardstock base. I stamped that cute little chick from the For Peeps' Sake Stamp Set in Daffodil Delight. I colored his beak with Pumpkin Pie and his eyes with Basic Black. I used Wild Wasabi Blendabilities to color in the green grass at his feet. I also used Daffodil Delight Blendabilities to color the dotted pattern strip from the Sale-a-bration Irresistibly Yours Designer Series Paper. Another coloring is on the Rhinestone center of the flower in Light Calypso Coral Blendabilities! Can you tell I love Blendabilities?
And here is a BONUS project! 
I created this card for a recent team meeting to demo Blendabilities and well it inspired me to create my Easter card. I used the Wild Wasabi, Soft Sky, and Daffodil Delight Blendabilities on this card. The bird and sentiment comes from the Sale-a-bration stamp set called A Happy Thing. I just loved the easy and simple layout too much not create more with it! If you ever want a splatter look, you must have Gorgeous Grunge Stamp Set to do it! I used it with Crumb Cake on the background.

Thanks for stopping by! I hope this inspire you!!!
Cindy
You saw my friend, Becky Cowley before me and now move on to my friend, Helene Legrand by clicking on the next button below! Be sure to stop by all 16 of us!

Did you know that some of the team members did the Leadership samples this year? You want to check them out on this Friday's post! Be sure to come back! 

Wednesday, February 18, 2015

Indescribable Blendibilities - Stampin' UP Artisan Blog Hop

 Welcome back to the Artisan Design Team Blog Hop! We are winding down on our February 2015 box from Stampin' UP. This box was full of brand NEW products from the Stampin' UP Occasions Catalog! Every Thursday of each week, all 16 of us from all over the world will post on our blogs an inspiring project for you! Be sure to get Google Translate so that you can read in your language all about how they created their projects too. Now on to my project this 3nd week and my Facebook project for Stampin' UP...
For my first card, I played around with using the Blendabilities markers on Kraft cardstock and turns out I really love the look of it! I used the Indescribable Gift Stamp set and the Pink Pirouette and Wild Wasabi Blendabilities. This stamp set is so perfect for using Blendabilities with ease. TIP: When coloring on Kraft cardstock, you need to color each tone twice for a more brighter color. I went ahead and made another card with a similar layout as the first card. This time, I kept the stamp image and coloring to the center single layer. I used the Soft Sky and Wild Wasabi Blendabilites. The details on both included Pearls, those beautiful butterfly from the Butterflies Thinlits Dies and the Painted Blooms Cotton Twine.
Thanks for stopping by! I hope this inspire you!!!
Cindy
You saw my friend, Becky Cowley before me and now move on to my friend, Helene Legrand by clicking on the next button below! Be sure to stop by all 16 of us!

Wednesday, February 4, 2015

Blendablities REFRESH - Stampin' UP Artisan Blog Hop

Welcome back to the Artisan Design Team Blog Hop! We are just starting on our February 2015 box from Stampin' UP. This box was full of brand NEW products from the Stampin' UP Occasions Catalog like the new colors of Blendabilities! I love Blendabilities and I plan to inspire you with some great projects showcasing them! 
Every Thursday of each week, all 16 of us from all over the world will post on our blogs an inspiring project for you! Be sure to get Google Translate so that you can read in your language all about how they created their projects too. Now on to my project this 1st week...
I did a similar style card last year and I wanted to show how this fun artsy style can continued to be made using newer stamps and Blendabilities. I first used NEW Bermuda Bay Blendabilities and covered my Whisper White card layer with the Light version with the large tip end. I stamped the Indescribable Gift Stamp Set in Memento Ink on top. You then take the Medium and Dark Bermuda Bay Blendabilities and color in the flowers. I used the NEW Wild Wasabi Blendabilities in Medium and colored in the leaves and stem. Once finished, I framed the image with the Project Life Journaling Pen. Then I added finishing touches like the stamped wording cut in boxes, White Cotton Ribbon and Gold Glitz Dazzling Details to complete the card.

Thanks for stopping by! I hope this inspire you!!!
Cindy
You saw my friend, Becky Cowley before me and now move on to my friend, Helene Legrand by clicking on the next button below! Be sure to stop by all 16 of us!

Thursday, April 10, 2014

MDS Blog Hop - Spring Ready

WELCOME TO THE MDS BLOG HOP!
A bunch of us have joined together to share our passion for digital designing with Stampin' UP's My Digital Studio.  These ladies are SERIOUSLY talented in MDS and I am thrilled to be on this Blog Hop with them! You will find us blog hopping on the 2nd and 4th THURSDAYS of each month! We will have a "theme" selected on the first hop and then a "What we are doing in MDS" on the second hop. The theme this month is Easter or Spring! I am not ready quite yet for the first but I am ready for the second!
Have you ever heard of the style BOKEH? 

In photographybokeh (Originally /ˈboÊŠkÉ›/, /ˈboÊŠkeɪ/ boh-kay — also sometimes heard as /ˈboÊŠkÉ™/ boh-kÉ™, Japanese: [boke]) is the blur, or the aesthetic quality of the blur, in out-of-focus areas of an image. Bokeh has been defined as "the way the lens renders out-of-focus points of light".

I have been wanting to try this in MDS so I thought this was the perfect time to try.
The background is Soft Sky. I then added the confetti image from the Cake and Ice Cream download. It comes on the page small so I just enlarged it to the size circles I wanted.  It makes it more pix-elated but I like that! Then I changed it to Whisper White and changed the opacity to 20 percent.  I copied and pasted the image again. This time I rotated it to the right and changed the opacity to 40 percent. I did this at least two to three more times rotating and changing opacity til I filled the page to my liking. Give it a try!

Then it was just filling in with some great embellishments and stamps paired with one perfect photo of me and my baby girl!  The picture was the inspiration for the color combo of Crisp Cantaloupe, Basic Gray, Daffodil Delight, Basic Black. I loved using the wood elements for the flag and photo mat. Under that mat is the OOPS part on the wood. Recolored the brads and wood heart too! The butterflies and flower gives it that "spring" feeling!

Thanks for stopping by! I hope this inspires you!
 Cindy 
Click on the button to move on to see what Cori made!

Wednesday, March 27, 2013

MDS Blog Hop - Easter Decorating with MDS

 
So here is what I worked on over the weekend...a little last minute Easter decorating!
I had this 8x10 canvas and had seen something like this on Pinterest so I knew I could do it with help from My Digital Studio! Plus I am still in a crafty mood after my friend's Pinterest Craft Weekend which I came home with 10 finished projects all from Pinterest! Those eggs in the picture where from that weekend too!
I added the Little Additions bunny stamp brush image with the Celebrate Easter Happy Easter stamp brush image and fun dotted DSP onto two sheets of 8.5x11 (here they are together to show you)


Then embellish! Cut the words and added with dimensionals.  Add a banner with the Hearts a Flutter Framelit cut flag, pennant punch in Melon Mambo, Calyspo Coral and Daffodil Delight, and then some Baker's Twine string thru it all. Speaking of baker's twine, see his little pom pom tail? That is SU's own Baker's Twine! Follow this tutorial on how to make them. I made two of them together for the tail. Those are soooo cute!
  
I can't scream loud enough how versatile this program is! And even better, you can get it now for just $19.95 US/$24.95 CAN! AND it now comes with $500.00 of content too! Now is that exciting or what? Raise your hand if you agree! Find out all about it HERE!
 
Happy Easter!
Cindy
 
Thanks for stopping by our blog hop today! 
You can always check this our past creations on our Pinterest Page HERE!
Start hopping below and be sure to see everyone!
Comments make us girls blush and smile!
Thanks to Wendy for joining us this month as our guest blogger!