Thursday, October 29, 2015

Fancy Friday - Treats not Tricks!

Welcome to the FANCY FRIDAY BLOG HOP 
for a Treats not Tricks challenge!
My fancy friends and I are BACK! We loved working with each other so much that we decided to continue on with an all new blog hop to inspire you in fun new ways! Each month on the last Friday, we will bring to you new challenges of all kinds (color,sketch, stamp focus, etc) that you can even participate in!  Use #fancyfriday with your challenge project!

This month we are having fun with a some last minute treats that you can make! I went with some simple and quick Halloween treats that you can do. Grab a kraft gift bag, the Howl-o-ween stamp set and the Boo to You Framelits as well as the Spider Web Doilies. Use whatever embellishments you have on hand!
 This is for the wicked witch! I am loving the frayed Rich Razzleberry Cotton Ribbon that looks a little like a broom! I added some punch stars in Black Glimmer Paper on the hat.
This is for the "dead man tells no tales" pirate! I took the cotton ribbon in Real Red and made a headband. I cut off the fleur de lis tips on the doily here for a more masculine look here. I stamped the Gorgeous Grunge in Crumb Cake on the gift bag for some splattered background. That is the Smoky Slate Chevron Ribbon! Don't you love it!
 
This was fun to make! I was inspired by my daughter Megan's painted pumpkin this past weekend so I had to make the skull and bones into a Day of the Dead or Día de los Muertos character. I used the Kraft gift bag for the front layer as well. I used Stampin' UP write markers in Melon Mambo, Bermuda Bay, Tangelo Twist and Cucumber Crush. I just did it all by hand while looking at samples of the image.  
Finally, here is my after Halloween project using this stamp set and framelits. A pirate birthday card for a boy! I used a whole Spider Web Doily and the greeting is from a retired stamp set from last year. I made a few of these so I have them on hand.

Thanks for stopping by our Fancy Friday Blog Hop! I hope this inspires you!
Cindy

You saw Cathy Caines before me and now move on to 
Connie Collins by clicking on the next button below! 

Wednesday, October 28, 2015

Sparkly Seasons - Stampin' UP Artisan Blog Hop Finale

Welcome back to the Stampin' UP Artisan Design Team Blog Hop! 
We are finishing on our October 2015 box from Stampin' UP as well as our Artisan Team commitment. What a year plus a few months it has been!
This box was FULL of super fun holiday products 
from the NEW Stampin' UP Holiday Catalog!!!!!  
Creating with these amazing products and sharing with you all here has been my favorite thing to do! This week, 13 of us from all over the world will post on our blogs an inspiring project for you and a special offer with prizes! Be sure to get Google Translate so that you can read in your language all about how they created their projects too.  Now on to my very LAST 2014-2015 Artisan Design Team project....(let me get a tissue first)
This week we are showcasing the Sparkly Seasons Photopolymer Stamp Set and Seasonal Frames Thinlits Dies. This is a great "build your own" collection and you can buy it in a bundle for less! #140863
For my first card, I went with the Halloween theme. Chevron is my favorite pattern so naturally I had to make a purple chevron pumpkin!  It is sponged in Rich Razzleberry on the stamp. I took the large rectangle thinlit die and cut it with the Happy Haunting DSP and Black Glimmer Paper. The Banner Punch adds a flag of color to match the greeting thinlit SPOOKY. Another part I love is the Linen Thread behind the pumpkin to look like pumpkin patch vines.
 
Then I took the basic layout of the above card and switched it to a Christmas theme. Ok, that Reindeer Clip finally grew on me and I had to make it a Rudolph with the Real Red Pompom Trim. I stamped the Nutcracker and presents in Sahara Sand for a softer image behind the greeting.
And finally.....I absolutely love snowmen! I also love snowglobes! I even have a collection of them that I display each year at Christmas time. I have over 20! For my last card, I had to use the adorable snowman in a snowglobe, of course! I took a piece of window sheet and White Stazon to put the stirred snow stamp image in the globe. Another fun way to step up those Snowflake Elements is to add Pearls to them. The pretty patterns are from the Season of Cheer DSP. And you know White Glimmer Paper adds a sparky snow touch!
 Now for some real fun! It's Treasure Hunt time! 
This week is our very last post as the 2014-15 Stampin' Up! Artisan Design Team. We've set up a global Treasure Hunt as a little thanks to you for following our adventures. 
Here's how to play:
1) Collect the names of 12 Stampin' Up! products by clicking through our blog hop this week. 

My Clue:
"Stampin' Dimensionals"
2) Fill out the entry form below. Leave your 12 correct answers in the comments to go in the drawing. My winner will get the following prize! A fix of fun goodies for some Christmas wrapping! You must be from the US in order to enter my drawing!
My Prize:
Please note: One winner will be drawn per Artisan according to their geographical location. Entries close 9pm, Wednesday 4th November Eastern Time (US). Winners will be contacted via email week beginning 9th November 2015. 
These prizes are a bit of love from us to you and are not sponsored by Stampin' Up! 
Thank you for following the 2014-2015 Artisan Design Team Blog Hop! I am a proud mama bear of this Global Team from all over the world! (We did it, ladies! WOOT!)

And on a personal note, I am forever grateful to have served Stampin UP on the past two Artisan Design Teams. (more tissues) I have gained many sisterhood friendships with each of these incredibly talented and sweet women! I have found huge support and encouragement among my followers and my peers. Each comment left on posts, meant the world to me and more then I could ever express! I am truly blessed! Thank you Stampin' UP for the journey! 
But don't fret, I am not going anywhere! I will still be posting weekly or monthly on new design teams or just me. 
Inspire. Create. Share. That's what I love to do.
Cindy
Now move on to my friend from France, Helene Legrand by clicking on the next button below!  Be sure to stop by all 13 of us! Plenty of good ideas to get your holidays kicked off!
And if you are wondering who is on the next Artisan Design Team...the new Team will be announced at Onstage on November 14th!!!  Excited to see who it will be!

CPC Sneak Peak - A Cutie Pie Christmas by Boni


Here is another sneak peak over on Craft Project Central this month! I am pretty excited about my project and the other designers' projects as well!  If you have never heard of CPC, then go check it out! Great way to get many project ideas! 
This festive set includes a trio of lit Christmas dioramas, a box full of assorted gift tags and a set of matching cards. This compilation is the perfect way to start the Holidays. The dioramas make a joyous centerpiece when used together or make lovely individual ornaments. The gifts tags make gift giving a breeze. This set makes the perfect gift for your neighbor, teachers and friends. Of course, be sure to make an extra to keep for yourself!

 This fun project comes to you designed by Boni! To get the instructions for Boni's project, just subscribe to September (or one of our 3, 6 or 12 month discounted packages!)! And if you have a minute, please leave Boni a comment on her project!  

Thanks for stopping by! I hope this inspires you!
Cindy

CPC Card Challenge #52 - Christmas Cheer

Creating Pretty Cards - Card Challenge #52

Each month in addition to the great 3D projects at Craft Project Central they host a monthly card challenge – Creating Pretty Cards!!  This month's sketch is #52 and I was totally inspired by our card sketch designer this month Christy with her Christmas card.
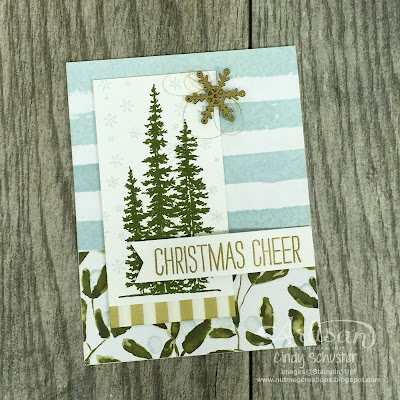
It gave me a chance to play with my NEW Christmas products from the Stampin' UP Holiday Catalog. I used a sheet of Season of Cheer Designer Series Paper where the patterns from both sides matched pretty well. I cut it 4 1/4" x 5 1/2". You will cut it at 2 1/2" across the bottom and flip it over. I used the lovely tree image from the Wonderland Stamp Set with Mossy Meadow Classic Ink. I gold embossed the greeting and the Snowflake Element. I love the Winter Wonderland Designer Washi Tape in the gold strip pattern too. 

It is a really great simple sketch so I hope you will give it a try and link your card over on the CPC post!  Also come see what others have made using this sketch! Challenge ends Oct 31st so no time to waste!
Thanks for stopping by! I hope this inspires you!
Cindy

Sunday, October 25, 2015

CPC Sneak Peak - Fall/Christmas Mantle Decor Ensemble by Julie W.

Here is another sneak peak over on Craft Project Central this month! I am pretty excited about my project and the other designers' projects as well!  If you have never heard of CPC, then go check it out! Great way to get many project ideas! 
Mantle Decor Ensemble SP
Fall is finally here and Christmas is just around the corner! What better way to celebrate the changing seasons than with this Fall/Christmas Mantle Décor Ensemble! The accordion style banner sits beautifully on a mantle or shelf to welcome fall into your home. Perfectly coordinated votive candles with tiny, dangling autumn leaves border the banner on either side. And can you guess the best part? Just flip the banner around and switch the dangling leaves on the candles for trees and stars and you are ready for Christmas! The banner folds up and fits nicely between the two candles inside the custom gift box. The gift box is also a great way to store the décor each year when not in use. Two matching greeting cards top off this festive ensemble.

 This fun project comes to you designed by Julie WTo get the instructions for Julie's project, just subscribe to September (or one of our 3, 6 or 12 month discounted packages!)! And if you have a minute, please leave Julie a comment on her project!  

Thanks for stopping by! I hope this inspires you!
Cindy

Thursday, October 22, 2015

CPC Sneak Peak - My Get Well Kit Project

Finally here is a sneak peak of my project over on Craft Project Central this month! I am pretty excited about my project and it is one that has several components that you could use for other uses besides a Get Well Gift like I did. If you have never heard of CPC, then go check it out!  
With Fall and Winter coming, you know that the cold season will be in full swing! How about making a little Get Well Kit to make a friend’s illness a tiny bit better to get thru? This kit comes with a tissue holder, a chapstick holder, tea bag holder, a can of soup and a notecard with matching envelope all in a container that you can carry! Guaranteed to cure and put a smile on their faces!

 To get the instructions for my project, just subscribe to September (or one of our 3, 6 or 12 month discounted packages!)

Are you interested in a free subscription to Craft Project Central for all of the October projects you have seen on my sneak peaks and my project above?  Well...I have one to give away!  All you have to do is pop over to my project at the Craft Project Central website and leave a comment by the end of the day on October 30th.  On Halloween October 31st, I'll draw one lucky winner for a subscription to all of this month's FABULOUS projects!

Thanks for stopping by! I hope this inspires you!
Cindy

Wednesday, October 21, 2015

Jolly Christmas - Stampin' UP Artisan Blog Hop


Welcome back to the Stampin' UP Artisan Design Team Blog Hop! 
We are just finishing on our October 2015 box from Stampin' UP. 
This box was FULL of super fun holiday products 
from the NEW Stampin' UP Holiday Catalog!!!!!  
I am so blessed that I get to create with these amazing products and share with you all here! Remember that every Thursday of each week, all 13 of us from all over the world will post on our blogs an inspiring project for you! Be sure to get Google Translate so that you can read in your language all about how they created their projects too. Now on second to last 2014-2015 Artisan Design Team project using the Jolly Christmas Stamp Set and the Merry Moments Designer Series Paper Stack! 
We are finally covering CHRISTMAS themed products! I made two quick and easy cards and some matching gift boxes showcasing the stamp set by using "parts" of it. I used the Christmas Greeting Thinlits Dies with Jolly and Peace to complete the greetings. 
I used the White Thick Cardstock as my base and Oval Framelit layer. I like how sturdy it is to place with one layer of Designer Series Paper and even stamp on it!  I am also loving the Merry Moments Designer Series Paper Stack. 48 sheets of two double-sided designs! A gal can make alot of the same card with that! Then I got this idea...6x6 makes the cutest little box with the Gift Box Punch Board and all I have to do is use the Merry Moments Paper Stack without cutting it at all! All you need is a fancy topper, some cording or ribbon, fill it with candy,chocolate or a small item and call it DONE!

 As the stamp says...HOLLY JOLLY! So I grab some punches, Old Olive Cardstock and the Real Red PomPom Trim and came up with this. Little something I learned years ago from a class of Heather Summers. I am loving the Christmas plaid pattern of the paper stack for the gift boxes! 
Here is a little video I made showing how I made the holly leaves. 
(Still learning on the video so be patient with me, my director daughter was feeling sleepy.)
Both of these are super easy for a demonstrator to teach at a holiday stamp a stack class OR a customer to order the supplies shown at the bottom and make 24 card and 24boxes or 48 cards or 48 boxes in a few hours! 
You could mark some to do's off your Christmas list right there!

Thanks for stopping by! I hope this inspires you!
Cindy
Now move on to my friend from France, Helene Legrand by clicking on the next button below!  Be sure to stop by all 13 of us! Plenty of good ideas to get your holidays kicked off!
Built for Free Using: My Stampin Blog

Monday, October 19, 2015

CPC Sneak Peak - Fry Box Mini Book Set by Michelle

Here is another sneak peak over on Craft Project Central this month! I am pretty excited about my project (Mine is posting soon!) and the other designers' projects as well!  If you have never heard of CPC, then go check it out! Great way to get many project ideas! 

Have you ever wondered if there was more you could do with the Fry Box Bigz L Die and the Big Shot than just make little boxes?  Yes you can!  In this Fry Box Mini Book Set Tutorial you will learn how to use your Fry Box Bigz L die to make a mini book that you can use for recording everything you are grateful for this Thanksgiving.  We will make the mini book and a holder for the book.  You will also learn how to make a wonderful 3-D flower using your Scallop Circle punches.  Let’s have some fun!
 This fun project comes to you designed by MichelleTo get the instructions for Michelle's project, just subscribe to September (or one of our 3, 6 or 12 month discounted packages!)! And if you have a minute, please leave Michelle a comment on her project!  

Thanks for stopping by! I hope this inspires you!
Cindy

Saturday, October 17, 2015

CPC Sneak Peak - Masculine Greeting Card Set by Monika

Here is another sneak peak over on Craft Project Central this month! I am pretty excited about my project and the other designers' projects as well!  If you have never heard of CPC, then go check it out! Great way to get many project ideas! 

Masculine Greeting Card Set with Backpack Box by the other Monika Davis I know.
Make this cool greeting card set for your hubby or a male friend, with a
stylish backpack box. You will make four different card designs with
nautical and classy styles. Make a ‘t-shirt’ and a ‘dress shirt’ card that
are easy to reproduce and will please any male recipient. If you have
trouble making masculine cards, this set is perfect for you. 


 This fun project comes to you designed by MonikaTo get the instructions for Monika's project, just subscribe to September (or one of our 3, 6 or 12 month discounted packages!)! And if you have a minute, please leave Monika a comment on her project!  

Thanks for stopping by! I hope this inspires you!
Cindy

Wednesday, October 14, 2015

Stampin' UP Artisan Blog Hop - Thankful Forest Friends

 Welcome back to the Stampin' UP Artisan Design Team Blog Hop! 
We are just finishing on our October 2015 box from Stampin' UP. 
This box was FULL of super fun holiday products 
from the NEW Stampin' UP Holiday Catalog!!!!!  
I am so blessed that I get to create with these amazing products and share with you all here! Remember that every Thursday of each week, all 13 of us from all over the world will post on our blogs an inspiring project for you! Be sure to get Google Translate so that you can read in your language all about how they created their projects too. Now on to my 3rd project this month and the one you can see on Stampin' UP's Facebook Page this month....

This week were are featuring the adorable Forest Friends Stamp Set and the Into the Woods Suite. I went in another direction with the color combo for a softer Fall look and tried Tip Top Taupe, Mossy Meadow, and Whisper White together.

I started with making some simple one layer stamped notecards. I used Tip Top Taupe as my notecard size base. I stamped in Mossy Meadow and Starz-On White with the stamp images. I took my Basic Black Stampin' Marker and outlined some of the animals' features like the nose and eyes.I also used my Project Life Corner punch and some Linen Thread to complete 6 notecards.
Now all I needed was a "package" to hold 6 of my notecards to give as a gift.
Here is how I assembled my package sleeve with the Square Pillow Box Thinlits.
(I confess... I am addicted to using them)


 To wrap the notecards together, I cut the Sketched Dots Tag a Bag Gift Bags into a 3.5" strip and secured with Mossy Meadow tape from the In Colors Designer Washi Tape. Don't forget the Whisper White Notecard Envelopes!  (I will use the remaining Whisper White Cards with some DSP and the Envelope Punch Board to make some custom envelopes later on another project.)
 I added two pieces of Linen Thread in between the sleeve piece and the designed top layer. Insert the cards and tie a bow to hold in place.

Thanks for stopping by! I hope this inspires you!
Cindy
Now move on to my friend from France, Helene Legrand by clicking on the next button below!  Be sure to stop by all 13 of us! Plenty of good ideas to get your holidays kicked off!
Built for Free Using: My Stampin Blog

CPC Sneak Peak - Cottage Box of Cards by Regina

Here is another sneak peak over on Craft Project Central this month! I am pretty excited about my project and the other designers' projects as well!  If you have never heard of CPC, then go check it out! Great way to get many project ideas! 

You will be amazed at how quick and simple it is to make this cottage-style
box with its stone-like exterior—a technique that you are sure to use again
and again.   The assortment of greeting cards feature the Hearth & Home
Thinlits dies, and two of the cards are styled for Christmas but could
easily be made for winter events and occasions.  You will definitely
appreciate the many design and embellishment ideas featured from beginning
to end in this tutorial, and don’t be surprised if you find a use/need for
cottage boxes in several rooms of your house.  This ensemble would be great
for a stamp camp or class project.


 This fun project comes to you designed by ReginaTo get the instructions for Regina's project, just subscribe to September (or one of our 3, 6 or 12 month discounted packages!)! And if you have a minute, please leave Regina a comment on her project!  

Thanks for stopping by! I hope this inspires you!
Cindy

Tuesday, October 13, 2015

CPC Sneak Peak - Fry Box Card File & Treat Box by Buffy

Here is another sneak peak over on Craft Project Central this month! I am pretty excited about my project coming up later this month and the other designers' projects as well!  If you have never heard of CPC, then go check it out! Great way to get many project ideas! 
Craft Project Central, Stampin' Up!
The holidays are fast approaching! Have you ever found yourself needing one
more card, last minute gift, small treat, or party favor?  In this tutorial,
you’ll learn alternative ways to use the Stampin’ Up! Fry Box Bigz L Die to
make a mini treat box that’s perfect for overnight guests’ “pillow gifts,”
table favors, or hostess gifts for workshops, and a larger file box that
holds note cards. This box is a perfect way to organize your fall and winter
cards, and it also makes a thoughtful gift. Instructions for the cards are
included in the tutorial. This would make a great class project as well!


 This fun project comes to you designed by BuffyTo get the instructions for Buffy's project, just subscribe to September (or one of our 3, 6 or 12 month discounted packages!)! And if you have a minute, please leave Buffy a comment on her project!  

Thanks for stopping by! I hope this inspires you!
Cindy

Friday, October 9, 2015

CPC Sneak Peak - Thankful for 30 days by Julie B

Here is another sneak peak over on Craft Project Central this month! I am pretty excited about my project and the other designers' projects as well!  If you have never heard of CPC, then go check it out! Great way to get many project ideas! This one looks like my favorite color combo!
Get ready to give Thanks every day during the month of November by creating
this project in October!! You will make thirty cards that you can send out,
one for each day of the entire month. They are cute and flat for easy
mailing! Plus you’ll make an Open-Top Box so that the cards are easy to
store and access when you need one. And you’ll learn how to alter a pre-made
journal to coordinate with the cards. Use the journal to document, and keep
track of those that you are thankful for! Make this for yourself, and make a
set to give – what a wonderful gift of thanks to give and also to pay
forward to another!! 

 
 This fun project comes to you designed by JulieTo get the instructions for Julie's project, just subscribe to September (or one of our 3, 6 or 12 month discounted packages!)! And if you have a minute, please leave Julie a comment on her project!  

Thanks for stopping by! I hope this inspires you!
Cindy

Wednesday, October 7, 2015

Acorny Thank You - Stampin' UP Artisan Blog Hop

Welcome back to the Stampin' UP Artisan Design Team Blog Hop! 
We are just finishing on our October 2015 box from Stampin' UP. 
This box was FULL of super fun holiday products 
from the NEW Stampin' UP Holiday Catalog!!!!!  
I am so blessed that I get to create with these amazing products and share with you all here! Remember that every Thursday of each week, all 13 of us from all over the world will post on our blogs an inspiring project for you! Be sure to get Google Translate so that you can read in your language all about how they created their projects too. Now on to my second project for this month....
We are using two of my favorite items in the Holiday Catalog! The Acorny Thank you Photopolymer Stamp Set and the Acorn Builder Punch! I have been creating with these two items on all kinds of Fall decor and cards lately. LOVE them!
Plaid is all the rage this year in Fall decor. I saw this plaid pattern of Designer Series Paper in the Happy Hauntings DSP and I was completely smitten! Even better is that the other side of it is large dots! Be still my heart! This color combo of Tangelo Twist, Basic Black, Smoky Slate, Very Vanilla and Kraft just works well for a fresh Fall palette so I used it for this trio of projects with the acorn theme.
So I was chatting with my friend and fellow ADT team member Susan Wong about the Reindeer Clips and I was talking about having a hard time using them on projects. She LOVES them. Well I found a way to love them too! I was playing with them on this card and discovered they look like the outline of fall leaves! You just have to hide the nose part!
I took the same plaid/dot pattern and the Acorn Builder Punch to create several of these fun acorns. Then punch smaller circle for stringing as a banner. To get the notches on the card, punch your 1/2" circle punch just a little less than half way. The black checked washi tape is from the Everyday Chic Washi Tape.
What about a matching treat bag with some of the leftover pieces I had? Just assemble together and staple right to the Mini Muslin bag. Super simple! I just threw in some hot cocoa mix packets and a bag of mini marshmellows. Perfect for those first cold Fall nights! Something I am always thankful for...
Thanks for stopping by! I hope this inspires you!
Cindy
Now move on to my friend from France, Helene Legrand by clicking on the next button below!  Be sure to stop by all 13 of us! Plenty of good ideas to get your holidays kicked off!
Built for Free Using: My Stampin Blog